
 roofhit.com
 Introduction: Embrace the Warmth: A DIY Guide to Building a Warm Flat Roof Structure A warm flat roof structure offers superior insulation compared to cold roof designs, placing the insulation above the roof deck to prevent condensation buildup. This DIY guide will walk you through the process of building a simple, yet effective, warm flat roof structure. Safety is paramount, so always wear appropriate safety gear and follow all local building codes. This is a general guide and specific project requirements may vary. Consult with a qualified professional if you're unsure about any aspect of the project.
Planning and Preparation: Gathering Your Materials and Tools Before you begin, you'll need to gather the necessary materials and tools. Proper planning ensures a smoother and safer construction process. Materials: Timber joists, OSB or plywood sheathing, vapor barrier, insulation boards (rigid foam), waterproof membrane (EPDM, TPO, or bitumen), adhesives/sealants compatible with roofing materials, fascia boards (optional), drip edge flashing, screws/nails appropriate for timber. Tools: Measuring tape, circular saw, drill/driver, hammer, utility knife, straight edge, safety glasses, gloves, roofing roller (for membrane application), sealant gun, ladder. Ensure your materials are of good quality and suitable for outdoor use.
Step 1: Constructing the Roof Deck The roof deck provides the structural base for your warm flat roof. This usually involves creating a joist system and covering it with sheathing. Determine the span between your supporting walls or beams and calculate the required joist size and spacing according to local building codes. Cut the timber joists to the appropriate length and install them at the calculated spacing. Secure them to the supporting structure using appropriate fasteners. Cut the OSB or plywood sheathing panels to fit the joist frame. Stagger the joints between panels for added strength. Secure the sheathing to the joists using screws or nails. Ensure the sheathing is flush and even.
Step 2: Installing the Vapor Barrier The vapor barrier prevents moisture from rising from inside the building and condensing within the insulation. Unroll the vapor barrier membrane across the entire roof deck, overlapping the edges according to the manufacturer's instructions (typically 150-300mm). Secure the vapor barrier to the sheathing using tape or fasteners recommended by the vapor barrier manufacturer. Ensure all seams and penetrations are sealed tightly to prevent moisture migration.
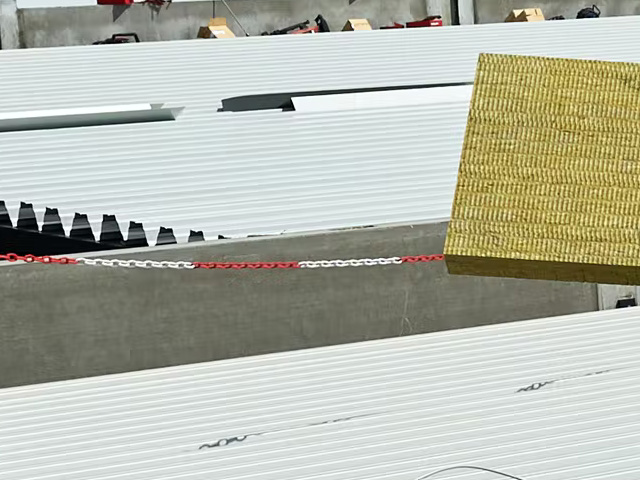
Step 3: Laying the Insulation Boards Insulation is key to a warm roof. Using rigid foam insulation boards will help to reduce heat loss through the roof. Cut the rigid foam insulation boards to fit the roof deck. Stagger the joints between boards for better thermal performance. Apply adhesive to the vapor barrier and place the insulation boards onto the adhesive, pressing firmly to ensure good contact. Follow the adhesive manufacturer's recommendations for application and curing time. Alternatively, secure boards with mechanical fasteners depending on manufacturer recommendations. Ensure there are no gaps between the insulation boards. If any gaps exist, fill them with foam sealant designed for insulation.
Step 4: Applying the Waterproof Membrane The waterproof membrane protects the insulation and interior from the elements. EPDM, TPO, and bitumen are common choices. Clean the surface of the insulation boards to ensure proper adhesion of the waterproof membrane. Unroll the waterproof membrane across the roof, overlapping seams according to the manufacturer's instructions. The specific application method depends on the membrane type (e.g., adhesive for EPDM, heat welding for bitumen). For adhesive-backed membranes, carefully peel back the release liner and press the membrane firmly onto the insulation. Use a roofing roller to ensure good adhesion and eliminate air pockets. For heat-welded membranes, use a propane torch to heat the seams until the material melts and bonds together. Be careful not to overheat the membrane. Seal all edges and penetrations (e.g., vents, pipes) with sealant compatible with the membrane.
Step 5: Adding Finishing Touches (Optional) Finishing touches enhance the appearance and protect the edges of the roof. Install drip edge flashing along the perimeter of the roof to direct water away from the fascia. Attach fascia boards to the edges of the roof deck to create a clean, finished look. Inspect the entire roof for any imperfections or leaks and seal them as needed.
Conclusion: Enjoy Your New Warm Flat Roof You've now successfully constructed a warm flat roof structure! Remember to regularly inspect your roof for any signs of damage and perform necessary maintenance to ensure its longevity. A well-maintained warm flat roof will provide excellent insulation and protection for years to come. If you encountered any difficulties, consult a professional roofer for assistance.
Warm Roof Construction
 flat-roof-company.co.uk
 Which Is Better Warm Or Cold Flat Roof- Find The Best!
roofhit.com Warm Flat Roof Construction: Explained
 flat-roof-company.co.uk


0 komentar:
Posting Komentar